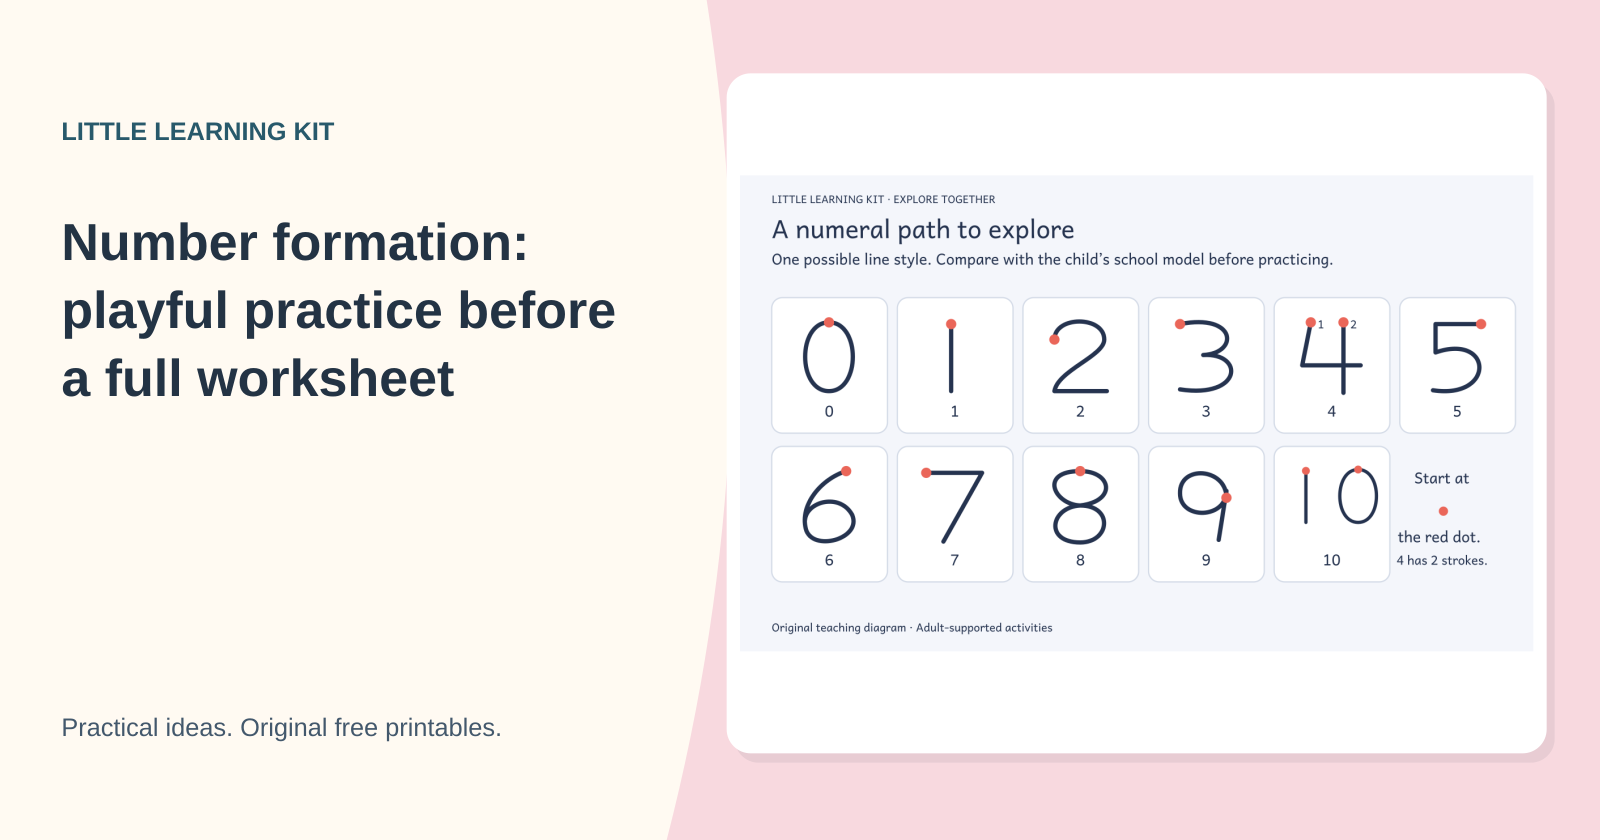
Start with a large model, watch how the numeral is formed, and practice a few times before making it smaller. Use the number shapes and formation approach your child's setting teaches.
Begin with one clear model
For number formation, show a large numeral, let the child watch it being made and practice a few comfortable movements before reducing the size. Use the numeral shapes and formation approach taught by the child’s setting when there is one. A short, clear attempt beside a model is more informative than filling a page with repeated marks that began in a confusing way.
Forming a numeral is not the same task as understanding its amount. A child may count five objects accurately while finding the pencil movement for 5 difficult. Another may copy a neat 5 without knowing what it represents. Keep a small matching quantity nearby for context, but choose whether today’s main focus is recognizing the symbol, making its movement or connecting it with an amount.
For practice with the amount rather than the pencil movement, return to counting through everyday play. Use a small real group and a number card without requiring a written numeral.
The teaching sheet shows 0 through 10 using a simple original line style, with starting dots. It is an example model, not a universal handwriting standard. The 10 is made from two separate digits, 1 then 0, arranged from left to right. Compare our forms with your school’s examples before choosing a practice sheet, particularly for numerals such as 1, 4 and 7 that often have visible variants.

Prepare the movement rather than a long task
Choose a comfortable writing position, enough room for the arm and a tool the child can control. Stabilise the paper if it slides. An adult can demonstrate on a separate sheet instead of moving the child’s hand for them. If writing causes discomfort or unusual fatigue, pause and discuss suitable support with the setting rather than prescribing a particular grip from an online activity.
Keep the model close to the practice space. Looking repeatedly between a distant wall display and a small worksheet adds a copying demand. A large numeral beside the child’s own attempt makes starting position and direction easier to compare. Use plain paper first if rows, boxes or decorations draw attention away from the movement you are trying to demonstrate.
Read it before writing it
Name the numeral and match it with an appropriate small collection or a number card. For 0, show an empty group within a clearly marked space rather than claiming there are no objects anywhere on the table. For 10, point out both digits and count a suitable collection only if that amount is comfortable. The writing task can stay focused on the symbol even when an adult supplies the counting support.
Practice at three sizes
1. Large movement in the air or on paper
Model the movement slowly, using the same concise description as the child’s setting if one has been provided. The child can follow with a finger in the air or make a large mark on paper. Place yourself so that they can see the movement from a similar orientation; drawing while facing them can make left and right harder to interpret.
Do not assume that a successful air movement automatically transfers to pencil control. The surface, friction and scale are different. Treat it as a way to discuss the path before writing, then offer a large paper version. If the child prefers to watch first, draw once and pause at the start of a second attempt so they can tell you where the movement begins.
2. Trace a visible model
- Use the number tracing sheets for a clear model, choosing a small number of examples.
- Demonstrate where to begin before asking the child to trace.
- A dot marks a start, but it does not by itself explain the whole route.
- Show changes of direction and any separate stroke.
Keep the route consistent across the adult demonstration and the sheet selected.
Tracing is a supported movement, not proof that the numeral can be recalled independently. Let the child lift their tool if necessary rather than forcing a continuous path that conflicts with the model. If tracing becomes an effort to stay perfectly inside a narrow outline, enlarge the example. The main observation is how the movement is organised, not whether every millimetre of the printed line remains covered.
3. Write beside the model
After one or two traces, leave a blank space next to the example. Invite a single attempt without the tracing line. Compare the beginning, direction and main features together. Choose one useful adjustment rather than listing every difference. For instance, keeping the top and bottom of a 3 facing the same direction may matter more than matching its exact width on the first try.
Return to tracing or a larger model if the blank attempt is too demanding. Those supports are options, not levels that must be permanently completed. You can alternate supported and independent marks within a short session. A child who remembers the path but struggles at a small scale may benefit from staying large rather than completing more tiny repetitions.
Make the start and turns visible
A starting point should sit on the path, not beside an unrelated decoration. On our line models, the coloured dot identifies where the demonstration begins. Numerals with more than one stroke have separate start markers and should be demonstrated in the stated sequence. Ask the adult to show the route rather than expecting a child to infer movement from a finished shape alone.
For a rounded numeral, trace slowly through the curved part and notice where the path closes or changes direction. For a numeral with straight segments, pause at the turn while keeping the overall shape visible. Avoid inventing a catchy rhyme that encourages a movement different from the child’s classroom model. A memorable phrase is only useful when it supports the intended form.
When a numeral is reversed
Compare the attempt with the upright model and point out one feature, such as which side the curve opens toward. Offer another large demonstration, then let the child try again if they wish. A reversal on a practice page is an observation, not enough information to diagnose a learning difficulty. Keep the response specific and proportionate, and share ongoing concerns with the child’s setting.
Distinguish an intentionally rotated card from a written reversal. Fix the model in the correct orientation before discussing the child’s mark. A baseline or aligned row can help show which way is up. The number recognition guide offers separate games for recognizing symbols when you want to work on the visual difference without adding pencil demands.
Build a practice row that has a purpose
A compact row might contain one clear model, two traceable copies and one blank space. After the blank attempt, stop to compare rather than automatically continuing down another twenty boxes. The child can choose the example they want to keep and identify a feature that became clearer. This makes the row a small investigation instead of a quota of identical marks.
Use the numeral in a meaningful label afterwards: three spaces in a pretend garage could receive a 3 card, or a picture of two objects could have a 2 written beside it. The adult can supply the label if writing is still tiring. That keeps the connection with quantity available without making every counting activity depend on handwriting success.
| Observation | Adjustment | Keep separate |
|---|---|---|
| Starts in an unexpected place | Demonstrate beside a visible start marker | Knowing the numeral name |
| Loses the turn | Enlarge and slow that part of the route | Exact size and neatness |
| Traces but cannot copy | Try one model beside one blank space | Memorising an amount |
| 6 and 9 confused | Compare upright cards before writing | Counting six or nine objects |
Choose what to repeat next time
If the starting point was forgotten, keep the same numeral and make its start more visible. If turns were difficult, use pencil journeys to explore similar curves or changes of direction at a larger scale. If the numeral was formed comfortably, try a slightly smaller model or use it in a practical label. Change one demand at a time.
Development Matters, guidance for England, includes children experimenting with marks and numerals; it does not prescribe the exact original line forms on this sheet. These activities are flexible suggestions for adult-supported practice. Follow the child’s own setting for required forms and specific support, and leave enough room for ordinary drawing and mark-making alongside targeted numeral work.
For a related next step, explore Name-writing practice: model, trace, copy and try or Pre-writing activities: lines, curves and purposeful movements.
Sources & further support
General parent support, not an individual assessment or a school programme. Check your child’s setting for its chosen approach.